Showing posts with label self-reliance. Show all posts

Saturday, June 8, 2013

Are we saving money ?

So, the question popped into my head when I looked into our shopping cart at the plant store last week... "Are we saving money by growing our own vegetables?".
The short answer is no. The long answer is yes.

2012-2013 being the first growing season at +The Littlest Farm we are saving no money at all. We didn't keep detailed records ( which I regret ) but we have spent quite a bit on dirt, compost, seeds, new equipment, etc. Even with all of our re-purposing and reusing ( raised beds of pallets etc. ) there were things that we just had to buy.

We are growing things that when we compare the price of a seed to the price at the supermarket are remarkably cheaper. Tomato is much cheaper to grow at home, as are lettuces and squash and next year when all we are buying is a couple cubic feet of soil booster it will be solid savings.

It's important that all gardeners learn that the investment phase of the garden is crucial. I don't speak only of the investment of money, but the investment of time. A properly planned and maintained garden will bring great amounts of food and enjoyment year after year.


Looking at the above graphic you can see the return on investment ( bottom right corner ) is quite impressive. Add to that the gratification of growing your own food and frankly... who cares if you are saving money.... you are gardening. 

Saturday, April 27, 2013

Radish Greens Soup

We picked our first prize from the garden last week and after proudly munching on it raw in the garden ( with huge grins ) we dashed to the kitchen to make something from it.

What we picked was our radishes and what we made was Radish Greens Soup. A subtle yet hearty Italian inspired soup great for any day.


Radish Greens Soup

  • 1 tablespoon of olive oil
  • 1 cup chopped leeks
  • 3 medium potatoes chopped
  • 3 bunches of radish greens
  • 5 cups of veggie or chicken stock
  • 1/2 cup of cream
  • 1 tablespoon of butter 
  • 5 tablespoons of grated Parmesan


In a large saucepan saute the leeks and radish greens in the olive oil for a few minutes ( until soft ). Stir in the potatoes and toss over medium heat for five minutes. Add the stock and bring to a boil. Reduce heat to a simmer and let cook for 20 minutes.

Partially puree the soup in a blender and return to sauce pan. Stir in the cream, butter and parm. Garnish with julienne of raw radish and enjoy. 

Tuesday, April 9, 2013

Chard Wars

It's a beautiful day in the bay area. 73 degrees Fahrenheit, sunny and nothing to do in the garden but water and watch everything grow.

Or.... be silly and stage the many battles of the epic sci-fi series Chard Wars 


Battle of Strawberry Buds

The Empire invasion of Carrots 

Radish Troopers are done looking for droids


The Epic Chard Wars. 
patent pending :) 


Saturday, March 30, 2013

March Update

I've decided to do a monthly update in addition to our regular posts. It's almost impossible to tell you everything that we have going on here... but I'm going to try anyway.

First, some very exciting news. Our potato experiment appears to be working !


There is also a number of sprouts coming out of the side of the cage as we hoped. It's very exciting. It took 16 days from planting our potato cuts to seeing growth breaking through to bask in the sun. We are very proud of our tiny tubers. 

Generally all around the garden we are seeing a lot of progress. Little green folks popping up all over the place. 

Look at all our little green friends !

We also picked and ate our first radish. 

The peas are starting to grab their trellis. 

Strawberries are doing great in their gutter.

This poppy should be in full bloom any minute now. 

And just for fun here is a list of everything we are growing.

  1. Radish
  2. Red Stalked Celery
  3. Purple Broccoli
  4. Carrot
  5. Parsnip
  6. Rainbow Chard
  7. Chioggia Beets
  8. Golden Beets
  9. Sugar Snaps
  10. Shell Peas
  11. Basil
  12. Chive
  13. Tulsy Basil
  14. Chamomile
  15. Oregano
  16. Cat Nip
  17. Mint
  18. Butter Lettuce
  19. Spinach
  20. Oak Heart Lettuce
  21. Arugula
  22. Bok Choy
  23. Daikon
  24. Russet Potato
  25. Butter Potato
  26. Red Potato
  27. Red Cabbage
It's been a fun,exciting and challenging month at The Littlest Farm with so much more to come in April.


Thursday, March 14, 2013

The Great Potato Experiment

Over the winter as we planned our garden we often modified our ideas through several versions until we agreed on the best way to build or layout whatever was on the docket that day. Nothing was more debated or went through more evolution than our potato plan.

We love potatoes and eat them all the time so obviously we wanted them in the garden but there are so any different growing mediums out there that we couldn't decide which one was for us.

Since our first priority in all projects is to re-purpose and reuse otherwise useless materials our initial inclination was to use old car tires stacked to contain our spuds.


We read about this idea in a great book The Urban Homestead. This book is full of great tips and ideas but ultimately we didn't choose this method because of fears of what might leech from the tires into our soil. This fear might not be completely founded but regardless was a concern for us. 

The second idea that we considered was to just put them in their own raised bed and grow them one plant at a time. An idea that obviously as worked just fine for a few million years but that doesn't mean it is good enough for us. 


The trouble with this age old method of tater production is that it just didn't seem efficient enough to us. We love the idea of the tires and stacking up plant on top of plant and really wanted that increased yield without the side effects. 

And that is when my wife had a brilliant idea. 

The TUBER CAGE!!


The plan was to take a six foot long section of hardware cloth or welded wire that was three feet tall, pull it into a circle three feet in diameter ( had to use pi to figure that one out , Happy Pi day! ) and fill it with layer after layer of potatoes and that is what we did. 
Check out the pics of the process and we will keep posted as to their progress. 

The spudded potatoes

The hope is the plants will grow out the side toward the sun

Cross your fingers. 


Click HERE for an update on our experiment. 

Tuesday, February 12, 2013

Re-using + Re-purposing = Awesome


I had my first day off in a while today and decided to make a concentrated effort in reducing our pile of "scrap" wood. If you have been following The Littlest Farm you know that we make use of discarded pallets for most of our projects. When you use pallets you end up with seemingly useless scraps. My goal today was to use the useless. I think I did an okay job...

The scrap pile

My first idea was to add to the table we had built earlier in the week. So I threw together a condiment box for our many BBQ's.


Yes, that table is made from a pallet. 90% of what we build is made from pallets... why are you surprised?
I had some 2x4's laying around and so after the box I started making benches. I wanted to make chairs but frankly I'm not that gifted a carpenter. 

Kilgore approved

Squirrel approved

Now we have a complete outdoor dining area. Table, seats... squirrel people and cheap beer. By the time it's BBQ season here this is going to be one awesome garden. 


Tuesday, January 15, 2013

Spring is coming

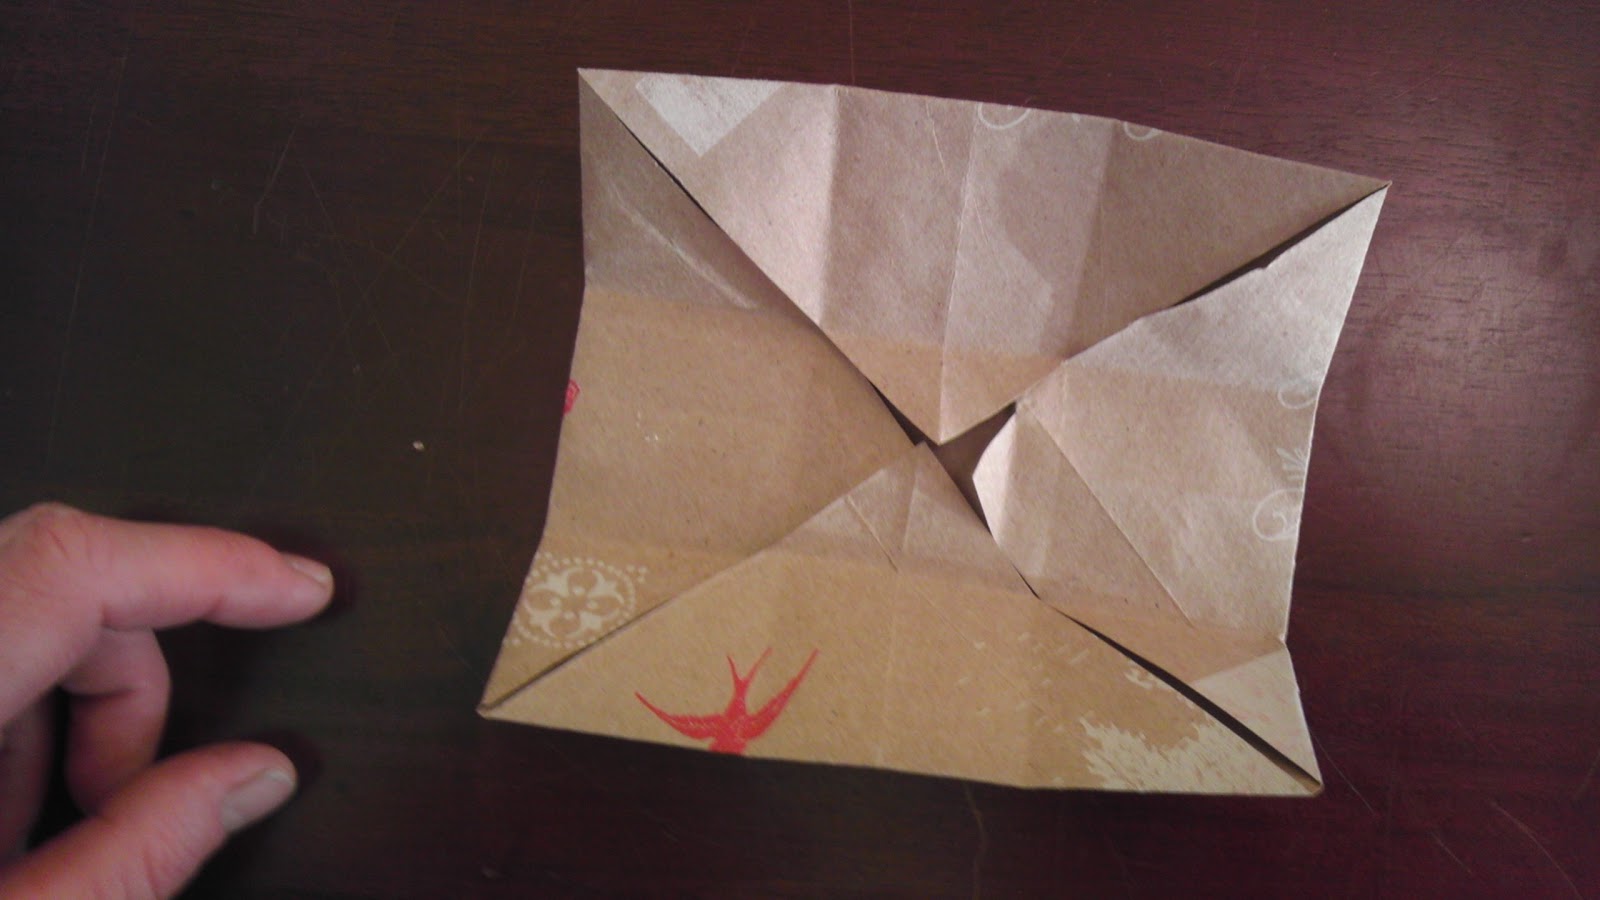
With spring just around the corner ( some of us closer to the corner than others ) some preparations need to be made. For us, the chief among them is getting our sees started. In a previous post we talked about the mini-greenhouses that we germinate in and briefly mentioned the origami boxes we make for each future plant to start in. Here is how to make those boxes.

We start by cutting up a paper bag into 7 x 7 inch squares ( giving us about 10 squares per bag ). 


Then the folding begins. 
Fold the square twice into a triangle.
Unfold your creased triangle
and turn the corners in.

Fold into thirds lengthwise

Crease and again unfold.


Fold in the corners
Fold up the two sides of the 1/3 fold and 
tuck in the ends.

Tuck in the other end.
There you go !
A 1 3/4 square box perfect for starting seeds indoor or outdoor.

Wednesday, December 26, 2012

Poultry Killing Cones Construction


Found this brilliant and simple design on +Youtube for a chicken "killing cone". Don't worry if you are weak of gut.. there is no chicken killing in this video.


Sunday, December 23, 2012

Such a long list...

Dear Santa,
     I know it's ridiculous to complain about the weather in California... but please bring spring. 

Sincerely, The Littlest Farm 


It is ridiculous to complain about the weather here but there is so much work to do and so little time in the day.
Planter Boxes to build.
A new compost bin.
Prepare for Chickens.
Seeds to order.
Set up a new water capture ( which includes installing gutters ).


It can seem really overwhelming at points but damn if it isn't also exciting as all hell.

Immediately after the holidays it's time to get down to serious work. Spring is soon. I'm going to build a workshop - and then start building things in there.


Sunday, December 16, 2012

Growing in Straw Bales

We have been doing a lot of research into growing in straw bales. It is a brilliant way to garden organically when you are short on space.
People we have talked to with experience have grown primarily root vegetables but I am finding there are endless options.
It is a great alternative to planter boxes.

From what we understand straw bales are better than hay bales because hay bales contain seeds and you would essentially be importing weeds into your garden voluntarily.
They can support tall plants so corn, tomatoes and vine beans are possible.
The bales make great compost after harvest.

Anyone have any experience? Tips or tricks let us know...

You can follow us on Facebook and Google+  

Thursday, December 13, 2012

Starting Seeds


It can be a challenge getting seeds to start on any given day and even more of a challenge in the winter.

In our tiny little home we don't have the space to start seeds inside so creative solutions were needed.

Meghan re-purposed an old shower curtain and used some scrap wood leftover from a previous project and built this awesome mini greenhouse.


When we woke up this morning it was 38 degrees outside but it was nice and toasty in our seed started box. The greenhouse has even accelerated germination on some plants. Seeds that were supposed to take 2 weeks to pop out of the ground were peeking little leaves in just a week. It's amazing what you can do with what might otherwise be garbage. 


Tuesday, December 11, 2012

Shrooming

 Had a nice little hike today. We have had a decent amount of rain here in the East Bay of California which means mushrooms... sometimes.

While Meghan & I were out we found an endless supply of mushrooms but having no experience with determining how edible they were ... we brought home nothing.

Nothing but awesome pictures and a desire to learn more about mushrooms.


Have any tips, resources or instructions for mushrooming in NORCAL? Let us know in the comments. 


In the beginning there was dirt & seeds.

Welcome to The Littlest Farm blog. We are Meghan and Lucas, urban farmers in the making.

Working with a roughly 45 square foot growing area ( plus some other creative solutions ) we hope to be celebrating a bountiful harvest at this time next year.

Our initial growing area

We also have plans for a 63 square foot chicken run, a rabbit, some bees ( we hope ) and a separate garden for growing both medicinal and culinary herbs. 

Proposed chicken run

The flower and herb garden

As you can see we have a lot of work ahead of us but it should be fun and eventually very delicious. Be sure to join us on Google+ for lots of pictures and bonus projects.