Showing posts with label urban farming. Show all posts

Tuesday, May 6, 2014

Raised Beds ( take 2 )


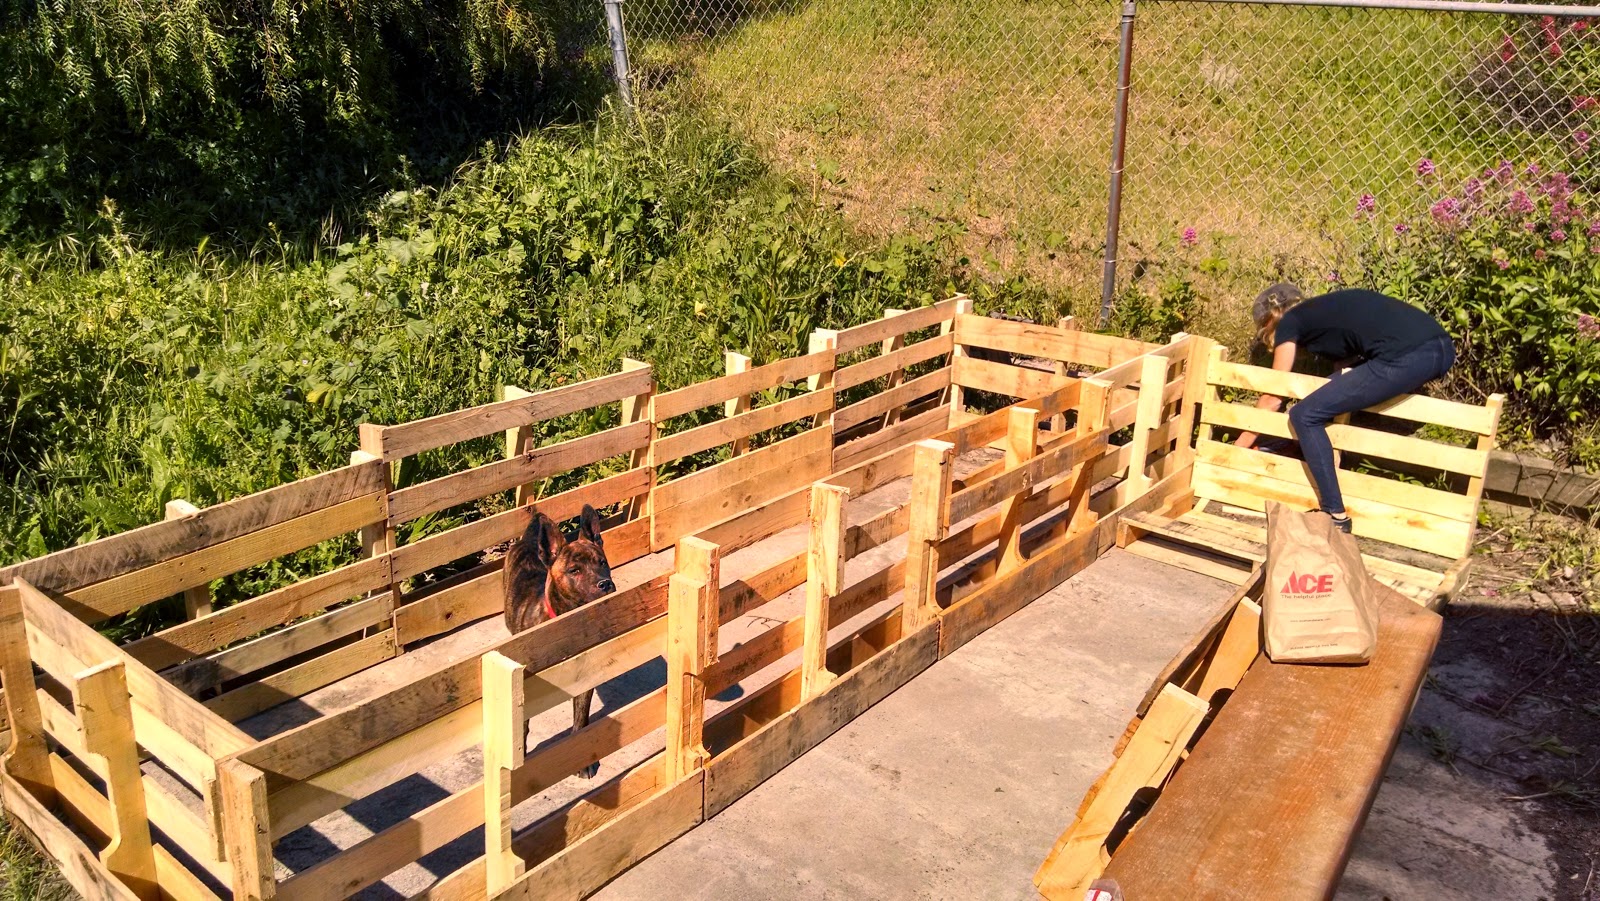
Some of you may remember our raised beds from last year. We used discarded pallets, broke them down to individual slats and rebuilt them into raised beds. Overall they worked wonderfully , but the major flaw was that they we a lot of work. It took us nearly two weeks ( on days off and after work ) to assemble 5 beds. This years effort took only about 2 hours to assemble and yielded over 80 square feet of growing area. 

As always we start with pallets.
12 in all, all cut in half.


Using wood screws we begin to piece them together.


It's a surprisingly fast process.


We lined the bottom with tree trimmings that 
would have been heading for the compost otherwise.

add 4 bales of straw 


Break up and spread the straw

Add a layer of compost

Spread to near the edges and make sure it is 6-8 inches deep.


Water thoroughly


Plan and Plant.

The medium of straw and compost has maintained an ideal temperature for growing. Our sprouts are coming up strong and fast. Some seeds ahead of their expected germination. As always we let you know how it progresses. 

Now enjoy this silly video of us ( and the dog helping ) build these beds. 


Saturday, June 8, 2013

Learning about the Tomatillo


Let's learn about the beautiful & tasty tomatillo 
It won't be this sciencey but might include Latin 
(you've been warned)


Let's start with the some fun alternate names for the tomatillo: "Husk Tomato", "Jamberry", "Husk Cherry", "Mexican Tomato".

The tomatillo is native to Central America and was domesticated around 800 B.C. 
     ( see how it went from fun to facts there... it's going to be a wild ride )

There are two main types of tomatillo ( here comes the Latin )
   Physalis ixocarpa : This is the tomatillo you most often see at the market. It's fruit is green and around 2 inches across, it's flavor is tart and it ripens to a pale shade of yellow ( much like our dining room if you have ever been over for dinner )


   Physalis philidelphica : The lesser known of the tomatillo family ( maintaining it's amateur status ) is a slightly sweeter version of the tomatillo we all know and love except it is also purple and grows to a marble size.


The tomatillo is part of the nightshade family ( Solanaceae ) meaning it is related to the tomato, the potato and the eggplant. Not only are the family reunions weird but they are delicious.

When given plenty of sun and well drained and very rich soil they will produce a very high yield. 

Speaking of harvest... transplants will be ready to harvest around 70 - 100 days. You will know to pick when their husks ( or vascular tissue ) begin to split off of the fruit.

not entirely accurate view of splitting tomatillo
more of a stripping tomatillo


The reason I love that I am growing tomatillos you ask ? Well, It is because they are easy to grow. If grown in a pot and given enough drainage, they are very hard to kill. 

Grow a tomatillo this year and share your favorite recipe with us 


Are we saving money ?

So, the question popped into my head when I looked into our shopping cart at the plant store last week... "Are we saving money by growing our own vegetables?".
The short answer is no. The long answer is yes.

2012-2013 being the first growing season at +The Littlest Farm we are saving no money at all. We didn't keep detailed records ( which I regret ) but we have spent quite a bit on dirt, compost, seeds, new equipment, etc. Even with all of our re-purposing and reusing ( raised beds of pallets etc. ) there were things that we just had to buy.

We are growing things that when we compare the price of a seed to the price at the supermarket are remarkably cheaper. Tomato is much cheaper to grow at home, as are lettuces and squash and next year when all we are buying is a couple cubic feet of soil booster it will be solid savings.

It's important that all gardeners learn that the investment phase of the garden is crucial. I don't speak only of the investment of money, but the investment of time. A properly planned and maintained garden will bring great amounts of food and enjoyment year after year.


Looking at the above graphic you can see the return on investment ( bottom right corner ) is quite impressive. Add to that the gratification of growing your own food and frankly... who cares if you are saving money.... you are gardening. 

Tuesday, May 28, 2013

Cool ( as a ) cucumber thing.


In yet another effort to use everything that we can get our hands on Meg grabbed some plum branches that were being pruned. The idea is to strip them of their bark, sink them into one of our raised beds, lash them together at the top with the stripped bark and use them for our cucumbers to vine.

Here is how she did it.

You will need:
  • branches of a sapling
  • a knife
  • bucket filled with water
  • pruning shears


First trim back all of the leafy branches leaving the strong main branch.
Hold onto those smaller branches though. You will need them.

After scoring the length of the branch peel back the bark

Soak bark for 15 to 20 minutes

Choose your location for the tripod


Using the soaked bark lash the tops together

Using the smaller branches begin your trellis. Lashing 
sets of branches using bark. 

Plant your cukes...

...stand back and admire. 

All in all the the project took around an hour and was fairly simple to do.  Plus, it looks really cool in the garden. 


Saturday, May 18, 2013

Mounds of Squash

We have a few squash going now in the lower garden ( squashes ? squishes ? what is the proper plural for squash ? ) anyway, we have some squishes growing now and I thought I would cover some squash basics that I have learned.

Fun fact : Squash are one of the oldest plants to be cultivated in the Americas. The other two are corn and beans.

 Here is a common question..Why does squash need to be planted on a "hill" ? Well, it's because they love water but need excellent drainage. The soil also warms better this way.  The mound or "hill" gives them everything they need to produce great amounts.


Summer squash can mature very quickly providing fruit in 50 days or so and the more you pick the more you will get.


It is also recommended to participate in the sex life of your squash. Don't blush now. Hand pollination to ensure pollination of the female flowers in turn ensuring baby squashes. Even if you have busy bees and butterflies this is a good idea. Simply take a small paintbrush and transfer pollen from the male plant to the stamens of the female.( Both pictured below ).

The Female

The Male

Do you have any squash growing tips? Share in the comments or hit us up on Google Plus or Facebook. 


Tuesday, April 30, 2013

April Update !


Has it been a month already ?!

I do love our monthly update, getting to look back at the work and the rewards is a very satisfying experience.

We picked our first crop of  radishes & made a delicious soup from them. Check our recipe for Radish Greens Soup.

Yum

Our potato system seems to be working out very nicely. In just over two weeks we are seeing marked growth improvement with our updated watering system. 

Before ( 4-12-13 )


After ( 4-29-13 )


While it is not yet quite canning time for us in California we did come across these cool 100th Anniversary Ball Jars that we can't wait to fill with jam. 

Because we have Blackberries & Strawberries coming in 

Finally, for anyone interested there will be a new Chard Wars post on Star Wars Day ( May the 4th )

Episode 1 : A Very Confusing Cast
Coming May the Fourth ( be with you )

As spring turns to summer more and more is happening on The Littlest Farm. Things to look forward to in May include our chicken coops, lots and lots of growth in the veggie garden and a detailed tour of our flower and herb garden. 


Saturday, April 27, 2013

Radish Greens Soup

We picked our first prize from the garden last week and after proudly munching on it raw in the garden ( with huge grins ) we dashed to the kitchen to make something from it.

What we picked was our radishes and what we made was Radish Greens Soup. A subtle yet hearty Italian inspired soup great for any day.


Radish Greens Soup

  • 1 tablespoon of olive oil
  • 1 cup chopped leeks
  • 3 medium potatoes chopped
  • 3 bunches of radish greens
  • 5 cups of veggie or chicken stock
  • 1/2 cup of cream
  • 1 tablespoon of butter 
  • 5 tablespoons of grated Parmesan


In a large saucepan saute the leeks and radish greens in the olive oil for a few minutes ( until soft ). Stir in the potatoes and toss over medium heat for five minutes. Add the stock and bring to a boil. Reduce heat to a simmer and let cook for 20 minutes.

Partially puree the soup in a blender and return to sauce pan. Stir in the cream, butter and parm. Garnish with julienne of raw radish and enjoy. 

Tuesday, April 23, 2013

The Life of Cabbage

Among the produce we have growing is red cabbage. Neither of us have grown cabbage before and knew nothing going in. We have had a warm spell here in California that had us concerned that the cabbage ( among others ) was bolting and wasn't going to properly grow and produce.
This prompted a Google search and a lot of learning about cabbage.


Stage 2 ( our current stage )

We looked at our plants and didn't see cabbage, we saw a weed like sprout in our beds. It will continue on like this, adding leaves and stems and leaves until stage 5 when it starts to look like it wants you to make soup out of it. 

Stage 5 a.k.a "pre-cupping"

By the end of stage 5 the base and the stems are completely concealed when viewing from above. 

When we hit stage 6 all we will be thinking about is corned beef recipes.

Stage 6 a.k.a. "cupping"

At stage six we will have between 20 and 25 leaves and the innermost "heart" leaves will be concealed by the larger older leaves. Then we leap forward to stage 9 ... Mature Cabbage !

Huzzah ! Let's throw them at lousy vaudeville comedians !

I am rather disappointed that not a single paper I read, website I looked at or stranger on the street could explain to me how it is that creepy dolls come from cabbage. 

How ?! Why?!


Tuesday, April 2, 2013

Creatures of the night are eating my cabbage !

Slugs, snails and other slimy creatures are attempting an invasion and we are holding our ground... slaying them by the dozens and using only natural techniques victory will soon be ours.

Most people see them like this


Gardeners see them like this

Fortunately, there is a good selection of natural techniques to keep this hungry critters at bay. 

Our first step is identifying what plants they have a particular taste for. You can't battle an enemy if you don't know where they are.

The next thing we do is set up a barrier. This can be done with crushed egg shells around the damaged plants, or discarded coffee grounds. You will want to make sure the barrier is between 2 and 3 inches thick. 

We tend to avoid the copper method mainly because it can be expensive but you can try this at home by purchasing copper tape at your local hardware store or garden supply. This through either magic or science electrocutes the little monsters and kills them. 

The favorite method at The Littlest Farm is beer. There are two ways to use beer, one more effective than the other. We save our empty cat food and tuna fish cans bury them in the soil, fill them with cheap beer ( slugs and snails have notoriously poor taste in beer ) and wait for those pesky mollusks to drink themselves to death. 


The second beer method is to just drink the beer, ignore the problem and have a good time. This method is significantly less effective.

What methods do you use?