Showing posts with label growing. Show all posts

Saturday, May 18, 2013

Mounds of Squash

We have a few squash going now in the lower garden ( squashes ? squishes ? what is the proper plural for squash ? ) anyway, we have some squishes growing now and I thought I would cover some squash basics that I have learned.

Fun fact : Squash are one of the oldest plants to be cultivated in the Americas. The other two are corn and beans.

 Here is a common question..Why does squash need to be planted on a "hill" ? Well, it's because they love water but need excellent drainage. The soil also warms better this way.  The mound or "hill" gives them everything they need to produce great amounts.


Summer squash can mature very quickly providing fruit in 50 days or so and the more you pick the more you will get.


It is also recommended to participate in the sex life of your squash. Don't blush now. Hand pollination to ensure pollination of the female flowers in turn ensuring baby squashes. Even if you have busy bees and butterflies this is a good idea. Simply take a small paintbrush and transfer pollen from the male plant to the stamens of the female.( Both pictured below ).

The Female

The Male

Do you have any squash growing tips? Share in the comments or hit us up on Google Plus or Facebook. 


Tuesday, May 14, 2013

The Littlest Potato

A recipe for one.

Not long ago Meg & I looked at our Potato Cage  and we saw a little root poking out... and there it was...

The Littlest Potato

We stuck it back in its place, gave it some encouraging words and waited... staring at the dirt gets boring after a while so we went and did some other things. 
Slightly less little potato


This stubborn potato fought again toward the surface so we plucked it, cooked it and ate it. 

Here is our recipe for one potato. It probably isn't a good recipe for a dinner party. 

First be sure to clean the potato thoroughly. It worked very hard at growing and deserves a proper death. Certainly don't yell "Get in my belly !"  at it. It's very rude. 

Boil for 10 minutes ( or until done ) 


Drain and Slice your potato

Add 1/32 of a tablespoon of butter and 22% of a pinch of parsley.
6 grains of salt and a 1/4 grind of pepper. 

Enjoy!


Saturday, April 27, 2013

Radish Greens Soup

We picked our first prize from the garden last week and after proudly munching on it raw in the garden ( with huge grins ) we dashed to the kitchen to make something from it.

What we picked was our radishes and what we made was Radish Greens Soup. A subtle yet hearty Italian inspired soup great for any day.


Radish Greens Soup

  • 1 tablespoon of olive oil
  • 1 cup chopped leeks
  • 3 medium potatoes chopped
  • 3 bunches of radish greens
  • 5 cups of veggie or chicken stock
  • 1/2 cup of cream
  • 1 tablespoon of butter 
  • 5 tablespoons of grated Parmesan


In a large saucepan saute the leeks and radish greens in the olive oil for a few minutes ( until soft ). Stir in the potatoes and toss over medium heat for five minutes. Add the stock and bring to a boil. Reduce heat to a simmer and let cook for 20 minutes.

Partially puree the soup in a blender and return to sauce pan. Stir in the cream, butter and parm. Garnish with julienne of raw radish and enjoy. 

Tuesday, April 23, 2013

The Life of Cabbage

Among the produce we have growing is red cabbage. Neither of us have grown cabbage before and knew nothing going in. We have had a warm spell here in California that had us concerned that the cabbage ( among others ) was bolting and wasn't going to properly grow and produce.
This prompted a Google search and a lot of learning about cabbage.


Stage 2 ( our current stage )

We looked at our plants and didn't see cabbage, we saw a weed like sprout in our beds. It will continue on like this, adding leaves and stems and leaves until stage 5 when it starts to look like it wants you to make soup out of it. 

Stage 5 a.k.a "pre-cupping"

By the end of stage 5 the base and the stems are completely concealed when viewing from above. 

When we hit stage 6 all we will be thinking about is corned beef recipes.

Stage 6 a.k.a. "cupping"

At stage six we will have between 20 and 25 leaves and the innermost "heart" leaves will be concealed by the larger older leaves. Then we leap forward to stage 9 ... Mature Cabbage !

Huzzah ! Let's throw them at lousy vaudeville comedians !

I am rather disappointed that not a single paper I read, website I looked at or stranger on the street could explain to me how it is that creepy dolls come from cabbage. 

How ?! Why?!


Sunday, April 7, 2013

Building a raised bed

It occurred to me today while helping a customer at the hardware store that not everyone knows how to build a raised bed... much less no how to plan what to put in it. So, starting today +The Littlest Farm  will be putting more effort into sharing the basics to help people get started growing.


This is a pretty solid tutorial. 


Never forget that the internet is a never ending source of plans. My personal favorite is Popular Mechanics. Their raised bed plans are unrivaled. 

Happy Growing! 


Tuesday, April 2, 2013

Creatures of the night are eating my cabbage !

Slugs, snails and other slimy creatures are attempting an invasion and we are holding our ground... slaying them by the dozens and using only natural techniques victory will soon be ours.

Most people see them like this


Gardeners see them like this

Fortunately, there is a good selection of natural techniques to keep this hungry critters at bay. 

Our first step is identifying what plants they have a particular taste for. You can't battle an enemy if you don't know where they are.

The next thing we do is set up a barrier. This can be done with crushed egg shells around the damaged plants, or discarded coffee grounds. You will want to make sure the barrier is between 2 and 3 inches thick. 

We tend to avoid the copper method mainly because it can be expensive but you can try this at home by purchasing copper tape at your local hardware store or garden supply. This through either magic or science electrocutes the little monsters and kills them. 

The favorite method at The Littlest Farm is beer. There are two ways to use beer, one more effective than the other. We save our empty cat food and tuna fish cans bury them in the soil, fill them with cheap beer ( slugs and snails have notoriously poor taste in beer ) and wait for those pesky mollusks to drink themselves to death. 


The second beer method is to just drink the beer, ignore the problem and have a good time. This method is significantly less effective.

What methods do you use? 

Thursday, March 14, 2013

The Great Potato Experiment

Over the winter as we planned our garden we often modified our ideas through several versions until we agreed on the best way to build or layout whatever was on the docket that day. Nothing was more debated or went through more evolution than our potato plan.

We love potatoes and eat them all the time so obviously we wanted them in the garden but there are so any different growing mediums out there that we couldn't decide which one was for us.

Since our first priority in all projects is to re-purpose and reuse otherwise useless materials our initial inclination was to use old car tires stacked to contain our spuds.


We read about this idea in a great book The Urban Homestead. This book is full of great tips and ideas but ultimately we didn't choose this method because of fears of what might leech from the tires into our soil. This fear might not be completely founded but regardless was a concern for us. 

The second idea that we considered was to just put them in their own raised bed and grow them one plant at a time. An idea that obviously as worked just fine for a few million years but that doesn't mean it is good enough for us. 


The trouble with this age old method of tater production is that it just didn't seem efficient enough to us. We love the idea of the tires and stacking up plant on top of plant and really wanted that increased yield without the side effects. 

And that is when my wife had a brilliant idea. 

The TUBER CAGE!!


The plan was to take a six foot long section of hardware cloth or welded wire that was three feet tall, pull it into a circle three feet in diameter ( had to use pi to figure that one out , Happy Pi day! ) and fill it with layer after layer of potatoes and that is what we did. 
Check out the pics of the process and we will keep posted as to their progress. 

The spudded potatoes

The hope is the plants will grow out the side toward the sun

Cross your fingers. 


Click HERE for an update on our experiment. 

Tuesday, February 26, 2013

In the gutter

It has been a busy couple of weeks here at The Littlest Farm... busy enough that we haven't had time to post but here are the latest updates and a quick instructional.

Let the updates begin!

Our starts have started.

It has only been a couple of weeks and we have all of our herb and ( bee attracting ) flowers poking their heads out.


Meg picked up a straw bale from a local horse farm for only eight dollars and built a planter box for it. 
Carrots were promptly planted.


There is also purple broccoli and red stemmed celery getting started in another set of beds.  


This posts instructional is a great space saver for folks with little room for growing. 

Gutters!

I purchased a ten foot section of vinyl gutter and cut in into two five foot pieces and using some masonry screws mounted it above our raised beds giving us a new space to plant our pick-able lettuces. 

First cap off the ends.

Drill some holes for drainage.

Mount brackets
I spaced them at 2 inches, 30 inches and 58 inches for a 60 inch section.

Insert gutter
I will be adding roughly 10% vermiculite to the soil for water retention.


Thursday, February 14, 2013

Getting Our Herbs and Flowers Started

It's a lovely day here in the East Bay. We hit around 70 degrees in the hills and with the sun beating down on us we were highly motivated to get some seeds going.

The focus was on herbs and flowers today. Somewhere between 150-200 of them as a matter of fact. We aren't growing 200 different herbs and flowers we are starting that many seeds in hope of a 50% success rate.

Our bag of boxes

You remember how to make seed start boxes right

Fill 'em with dirt

Water & Wait 


* A couple notes that apply to our ever increasing effort to reuse as much as possible. 
The boxes are made from grocery bags and the plant identifiers are made from a cut up milk jug. 


Thursday, January 17, 2013

Bean Teepee

We are hoping to build a bean tee-pee to go along with our early planting in February. If you have never had a bean tee-pee they are fun to build, have and eat. You create a great growing area for runner beans and end up with a neat little edible fort and who doesn't love a fort. I might be a technical adult but there is a child inside of me that gets all worked up at the idea of having a fort in the yard.

                                                         photo credit http://lillbutton2.blogspot.com/


Anyway, after a little bit of reading I have seen just how easy it can be to build a bean tee-pee. All you really need is bean seeds or starts, 6 to 8 bamboo or wooden poles each about 6 feet tall and a little wire to bind the whole thing together.
Clear a nice level spot that gets a lot of sun.The size of the circle will vary on the height of the poles ( use your best judgement here ). Once you have your circle set up begin putting out your poles at equal distances around the circle being sure to leave a large enough space in the front to get inside the tee-pee.
Sink each pole about six inches into the soil and lash them together at the top. If it doesn't seem very stable set up support wires horizontally every 2 feet or so ( again being sure to leave yourself room to get inside the tee-pee ).


Once you are set up plant 4 or 5 bean plants per upright and watch it grow.
It is important to ( once your plants have grown ) to harvest inside as much as on the outside to keep your proud structure/fort/trellis from collapsing. 

Enjoy! 


Tuesday, January 15, 2013

Spring is coming

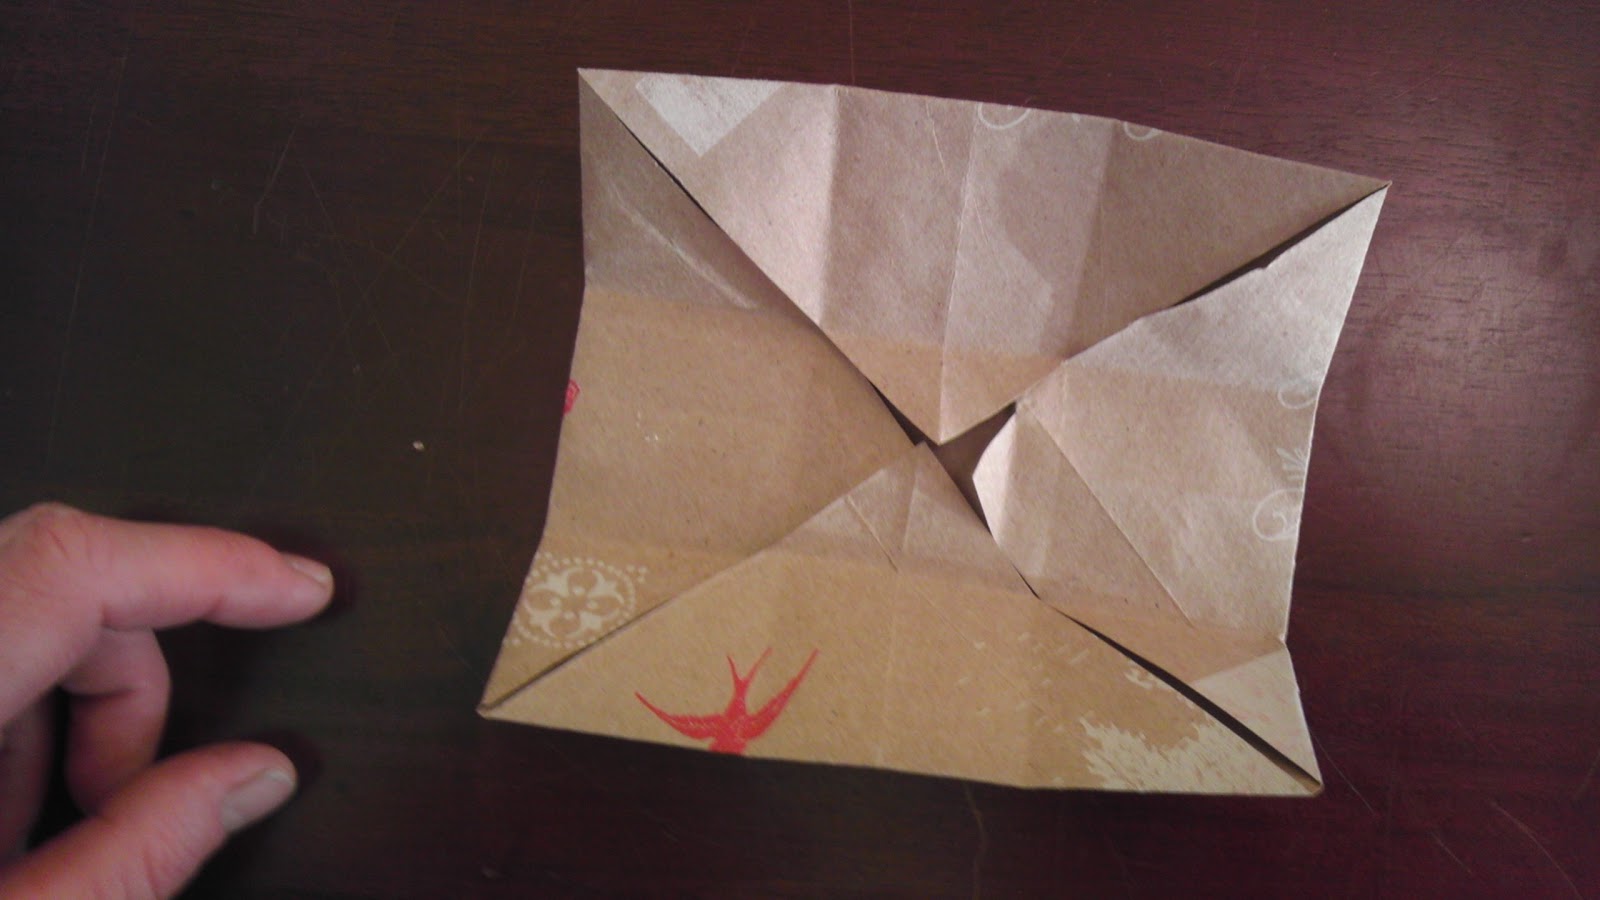
With spring just around the corner ( some of us closer to the corner than others ) some preparations need to be made. For us, the chief among them is getting our sees started. In a previous post we talked about the mini-greenhouses that we germinate in and briefly mentioned the origami boxes we make for each future plant to start in. Here is how to make those boxes.

We start by cutting up a paper bag into 7 x 7 inch squares ( giving us about 10 squares per bag ). 


Then the folding begins. 
Fold the square twice into a triangle.
Unfold your creased triangle
and turn the corners in.

Fold into thirds lengthwise

Crease and again unfold.


Fold in the corners
Fold up the two sides of the 1/3 fold and 
tuck in the ends.

Tuck in the other end.
There you go !
A 1 3/4 square box perfect for starting seeds indoor or outdoor.