Showing posts with label food. Show all posts

Saturday, June 14, 2014

Attack ! An encounter with the worlds deadliest chicken !

Steady yourself dear reader... what you are about to witness is largely boring. It's not very interesting at all. Seriously, at one point Meghan looks at a chickens butt. However, toward the end, right before I am laughing hysterically behind the camera... Meghan gets pecked in the eye by a chicken.


Sleep with one eye open... because you can't open the other one because a chicken pecked it.
hahahahahahahahaha

Saturday, June 15, 2013

Test your soil.

Is your soil alkaline or acidic? If you aren't sure here is a cool ( 9th grade earth science kind of cool ), cost effective and easy way to find out.  

Science Rules


You will need two containers approximately one cup in size
1/2 cup of vinegar
1/2 cup of baking soda
A couple handfuls of your soil. 

Go out in the garden and get yourself a nice fistful of dirt and split in into your two containers. 

In the first container mix in 1/2 cup of white vinegar. In the second container mix 1/2 cup of water ( mix ) and then 1/2 cup of baking soda. 

Product Placement ( I'm waiting for my check )

If container #1 begins to bubble and fizz it is alkaline. 

If you have no reaction turn your observation to container #2. Is it bubbling ? Well, you have acidic soil. 

I observed equally mild reactions placing our soil somewhere in the middle. A nice place to be since we can tilt the soil to the needs of a certain plant. Roses want some acidity... that's easy... just add some coffee grounds and the soil is suited in a couple days. 

Enough about my dirt let's get back to you. If your soil turned out to be acidic you can amend it with  wood ash or lime. If it was alkaline add sulfur or pine needles. 

Yup, you just used science. Congratulations.


Saturday, June 8, 2013

Learning about the Tomatillo


Let's learn about the beautiful & tasty tomatillo 
It won't be this sciencey but might include Latin 
(you've been warned)


Let's start with the some fun alternate names for the tomatillo: "Husk Tomato", "Jamberry", "Husk Cherry", "Mexican Tomato".

The tomatillo is native to Central America and was domesticated around 800 B.C. 
     ( see how it went from fun to facts there... it's going to be a wild ride )

There are two main types of tomatillo ( here comes the Latin )
   Physalis ixocarpa : This is the tomatillo you most often see at the market. It's fruit is green and around 2 inches across, it's flavor is tart and it ripens to a pale shade of yellow ( much like our dining room if you have ever been over for dinner )


   Physalis philidelphica : The lesser known of the tomatillo family ( maintaining it's amateur status ) is a slightly sweeter version of the tomatillo we all know and love except it is also purple and grows to a marble size.


The tomatillo is part of the nightshade family ( Solanaceae ) meaning it is related to the tomato, the potato and the eggplant. Not only are the family reunions weird but they are delicious.

When given plenty of sun and well drained and very rich soil they will produce a very high yield. 

Speaking of harvest... transplants will be ready to harvest around 70 - 100 days. You will know to pick when their husks ( or vascular tissue ) begin to split off of the fruit.

not entirely accurate view of splitting tomatillo
more of a stripping tomatillo


The reason I love that I am growing tomatillos you ask ? Well, It is because they are easy to grow. If grown in a pot and given enough drainage, they are very hard to kill. 

Grow a tomatillo this year and share your favorite recipe with us 


Tuesday, May 14, 2013

The Littlest Potato

A recipe for one.

Not long ago Meg & I looked at our Potato Cage  and we saw a little root poking out... and there it was...

The Littlest Potato

We stuck it back in its place, gave it some encouraging words and waited... staring at the dirt gets boring after a while so we went and did some other things. 
Slightly less little potato


This stubborn potato fought again toward the surface so we plucked it, cooked it and ate it. 

Here is our recipe for one potato. It probably isn't a good recipe for a dinner party. 

First be sure to clean the potato thoroughly. It worked very hard at growing and deserves a proper death. Certainly don't yell "Get in my belly !"  at it. It's very rude. 

Boil for 10 minutes ( or until done ) 


Drain and Slice your potato

Add 1/32 of a tablespoon of butter and 22% of a pinch of parsley.
6 grains of salt and a 1/4 grind of pepper. 

Enjoy!


Tuesday, May 7, 2013

Coping with loss

So, we are new to gardening in the Bay Area of California and are literally stumbling through this season trying to figure out what to do. We are so used to Oregon weather and throwing everything in the ground at the slightest hint of spring that we were not properly prepared for the tumultuous and unpredictable weather of our location. There was a sharp spike in the temperature with no rain and we lost several plants who went to seed prematurely.

Please join us in a moment of silence for our fallen plants.

Rainbow Chard- we hardly knew yee


Red Stalked Celery you were too beautiful for this world

Also among those lost were our daikon radishes and our snow peas are producing prematurely at a height of only 2 feet.

But instead of filling the void  on our plates with sadness we are promptly moving on to younger and better looking plants. Added to the fold are green and purple tomatillos , early girl tomatoes, piquillo pimento, orange and red bell peppers.

We are firm believers that if you don't fail you don't learn anything and boy are we learning a lot this year. It truly is an adventure in urban farming.


Tuesday, April 30, 2013

April Update !


Has it been a month already ?!

I do love our monthly update, getting to look back at the work and the rewards is a very satisfying experience.

We picked our first crop of  radishes & made a delicious soup from them. Check our recipe for Radish Greens Soup.

Yum

Our potato system seems to be working out very nicely. In just over two weeks we are seeing marked growth improvement with our updated watering system. 

Before ( 4-12-13 )


After ( 4-29-13 )


While it is not yet quite canning time for us in California we did come across these cool 100th Anniversary Ball Jars that we can't wait to fill with jam. 

Because we have Blackberries & Strawberries coming in 

Finally, for anyone interested there will be a new Chard Wars post on Star Wars Day ( May the 4th )

Episode 1 : A Very Confusing Cast
Coming May the Fourth ( be with you )

As spring turns to summer more and more is happening on The Littlest Farm. Things to look forward to in May include our chicken coops, lots and lots of growth in the veggie garden and a detailed tour of our flower and herb garden. 


Tuesday, April 23, 2013

The Life of Cabbage

Among the produce we have growing is red cabbage. Neither of us have grown cabbage before and knew nothing going in. We have had a warm spell here in California that had us concerned that the cabbage ( among others ) was bolting and wasn't going to properly grow and produce.
This prompted a Google search and a lot of learning about cabbage.


Stage 2 ( our current stage )

We looked at our plants and didn't see cabbage, we saw a weed like sprout in our beds. It will continue on like this, adding leaves and stems and leaves until stage 5 when it starts to look like it wants you to make soup out of it. 

Stage 5 a.k.a "pre-cupping"

By the end of stage 5 the base and the stems are completely concealed when viewing from above. 

When we hit stage 6 all we will be thinking about is corned beef recipes.

Stage 6 a.k.a. "cupping"

At stage six we will have between 20 and 25 leaves and the innermost "heart" leaves will be concealed by the larger older leaves. Then we leap forward to stage 9 ... Mature Cabbage !

Huzzah ! Let's throw them at lousy vaudeville comedians !

I am rather disappointed that not a single paper I read, website I looked at or stranger on the street could explain to me how it is that creepy dolls come from cabbage. 

How ?! Why?!


Tuesday, April 16, 2013

The Little Things


It's often overlooked in a lot of these blog posts how much little bits of work are put into the garden everyday. For us, Tuesdays and Saturdays are always jam packed with chores in and around the garden. There is ( of course ) weeding, watering, transplanting and contemplative squirrels to deal with  but there is also the little things.


Meg planting her Felicia Rose
(more to come on that rose later)


Refilling the slug traps.
(one for me... one for my sluggies)


I''m really starting to appreciate the maintenance for the first time. Getting out there, getting dirty, and tossing slugs & beer off this slimy mortal coil while Meghan waters with sniper like precision.  

Weeding the soon to be epic herb and flower garden.


Chewing on a bit of early harvest celery

The best of the little things happens tomorrow morning when we harvest the bulk of the radishes before work and get to share them with friends and family. 


And that squirrel thing that you have been wondering about since you read the first paragraph...

Contemplative Squirrel


Saturday, April 13, 2013

The Great Potato Nipple

Today we made some modifications to The Great Potato Experiment. It seems we missed a few small details in our slightly less than careful planning of our potato cage.

It seems obvious to us now, but we weren't getting enough water to the lower layers of taters... so after great debate and discussion we made what I am calling The Potato Nipple & for the record Meghan refuses to refer to it that way.

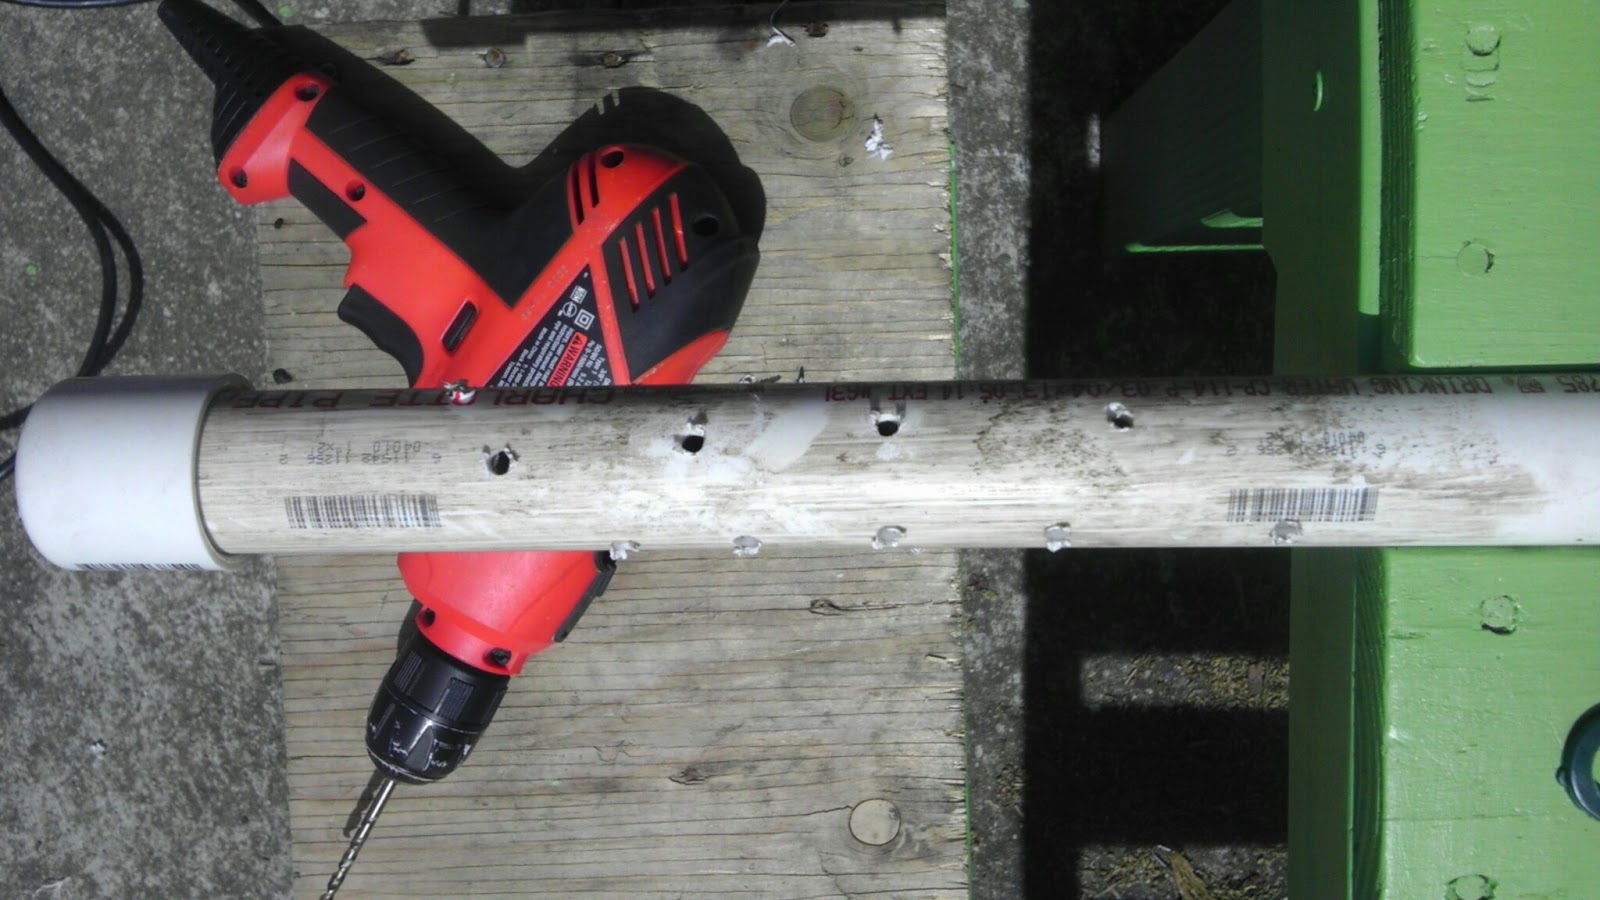
The problem was that the cage was 3 feet high and we needed water to make it at least 2 feet down so that it would soak the rest of the way down. 4 dollars in PVC pipe & fittings later we had it solved.
Here is how we did it.


The plants toward the top are doing much better than the one toward the bottom. So we wet the soil and hammered a 1 inch schedule 40 piece of PVC down the middle of the cage to create a cavity.

Once the wet soil had settled ( about 3 hours ) we pulled the pipe out & drilled several ( alot ! ) of 3/16 holes in the lover half of the pipe, put a cap on one end and a 1 inch couple on the other ( for stability )


We reinserted the pipe into the cavity ( holes drilled & cap on ) and put an inverted bottle on top filled with water ( not whiskey ) to create a slow drip system.

Happy Taters 

All of that being said, what we should have done is put a perforated pipe down the center of the cage when we initially planted, designated a hose ( or similar re-purposed drip system ) for watering. Either way we are still looking at a harvest of over 100 potatoes on a footprint of less than 3 feet. We got to be creative on an already creative idea and we are going to yield a lot of food.


Sunday, April 7, 2013

Building a raised bed

It occurred to me today while helping a customer at the hardware store that not everyone knows how to build a raised bed... much less no how to plan what to put in it. So, starting today +The Littlest Farm  will be putting more effort into sharing the basics to help people get started growing.


This is a pretty solid tutorial. 


Never forget that the internet is a never ending source of plans. My personal favorite is Popular Mechanics. Their raised bed plans are unrivaled. 

Happy Growing! 


Saturday, March 30, 2013

March Update

I've decided to do a monthly update in addition to our regular posts. It's almost impossible to tell you everything that we have going on here... but I'm going to try anyway.

First, some very exciting news. Our potato experiment appears to be working !


There is also a number of sprouts coming out of the side of the cage as we hoped. It's very exciting. It took 16 days from planting our potato cuts to seeing growth breaking through to bask in the sun. We are very proud of our tiny tubers. 

Generally all around the garden we are seeing a lot of progress. Little green folks popping up all over the place. 

Look at all our little green friends !

We also picked and ate our first radish. 

The peas are starting to grab their trellis. 

Strawberries are doing great in their gutter.

This poppy should be in full bloom any minute now. 

And just for fun here is a list of everything we are growing.

  1. Radish
  2. Red Stalked Celery
  3. Purple Broccoli
  4. Carrot
  5. Parsnip
  6. Rainbow Chard
  7. Chioggia Beets
  8. Golden Beets
  9. Sugar Snaps
  10. Shell Peas
  11. Basil
  12. Chive
  13. Tulsy Basil
  14. Chamomile
  15. Oregano
  16. Cat Nip
  17. Mint
  18. Butter Lettuce
  19. Spinach
  20. Oak Heart Lettuce
  21. Arugula
  22. Bok Choy
  23. Daikon
  24. Russet Potato
  25. Butter Potato
  26. Red Potato
  27. Red Cabbage
It's been a fun,exciting and challenging month at The Littlest Farm with so much more to come in April.


Tuesday, February 12, 2013

Re-using + Re-purposing = Awesome


I had my first day off in a while today and decided to make a concentrated effort in reducing our pile of "scrap" wood. If you have been following The Littlest Farm you know that we make use of discarded pallets for most of our projects. When you use pallets you end up with seemingly useless scraps. My goal today was to use the useless. I think I did an okay job...

The scrap pile

My first idea was to add to the table we had built earlier in the week. So I threw together a condiment box for our many BBQ's.


Yes, that table is made from a pallet. 90% of what we build is made from pallets... why are you surprised?
I had some 2x4's laying around and so after the box I started making benches. I wanted to make chairs but frankly I'm not that gifted a carpenter. 

Kilgore approved

Squirrel approved

Now we have a complete outdoor dining area. Table, seats... squirrel people and cheap beer. By the time it's BBQ season here this is going to be one awesome garden. 


Wednesday, January 2, 2013

So many things done

Sooo many things.

We woke yesterday morning with a new years vigor... as it turns out we don't drink enough.

By 9 a.m. we were breaking down pallets to build our raised beds.


By 10 a.m. we were squirrels 
( these things happen ) 


But, by Noon we were building raised beds, working on our GIGANTIC compost bin and generally falling in love with the littlest farm.

Here are some pictures :
building a new compost bin 
(from recycled pallets)

Cutting up pallets to make planter boxes


Raised bed made from 100% recycled materials.

I've said it before and I'll say it again. Pallets are a urban farmers best friend.